Showing posts with label Motorcycle. Show all posts

Sunday, May 27, 2012

A Tale of 3 motorcycles

If you are one of my avid readers you probably already know that the first bike I fell in love with was a Yamaha FZ6.  It spoke to me with its classic Yamaha fairing and the exhaust under the seat.  So I have always leaned heavily Yamaha.  I am sure, mechanically, the other major brands all have something to offer but from the symbol to the style of the bike and the legacy of the company I am repeatedly drawn to Yamaha's products.  I love the XS bikes.  I owned an XS850 and so I am partial to the triples but the XS650 whether a cafe, a bobber, or a revitalized original, is a beautiful bike and one of my favorite motors out there.  You should do some checking.  Search Bikeexif.com or Bubblevisor and you are sure to find some beautiful examples.  Almost all of my favorite bikes at Mods vs Rockers Cleveland were 650's (although there were some airheads which took my breath away).   I also, in an effort at granularity, must state that I do, someday, dream of having an old BMW airhead.  They are unique and beautiful in a classical sense.  They don't have Italian style or British Sensibility but they have such an air of Mechanical excellence that I truly desire to work on one someday.

So when I came to India I leaned towards Yamaha.  Bajaj is an Indian company that is very common and produces good bikes for the money.  Hero and Honda both also are here but something about Yamaha keeps bringing me back.  Everywhere I look, if I see a bike I like it ends up being one of the FZ models by Yamaha India.  Yamaha makes the FZ-16, the FZ-S (two color variety) and the Fazer (Sports tourer with fairing).  They all have the same 153cc motor (which is pretty good sized for most Indian bikes).

Yamaha RX135
Now I am a vintage guy at heart.  I love old bikes.  Fixing them, knowing them.  There is a relationship that develops when working on an old bike that I don't think you can have with a newer model that requires factory service.  I understood my XS850 because I made her run.  I also led to her not running but that is another story.  So when I came to India I dreamed of getting an old bike, making her a cafe and running the streets.  Unfortunately the culture and the support for such an endeavor does not, as a whole, exist in Hyderabad.  At least I haven't found it.  I was really looking into the RX135, an old 2 stroke design, and found one for about $500 US that looked in great condition and had a larger rear wheel installed which was great.  There were some legal complications towards acquiring this particular model and although parts would be easy to find, people stared at me with some confusion in me wanting an old bike and fixing it up.  The DIY spirit that exists behind the cafe and bobber scene does not exists among those I have met here.  So, it seemed, the vintage 2 stroke was not the best option.

Yamaha SZ-R
This lead me to doubling my budget to get a new bike.  This is still only about $1K to $1,200 US, which would be the price of an old bike after I got in safely running anyway.  So looking around I settled on the SZ-R.  It is a little cooler than most of the commuter bikes here in the city but is still practical.  It has disk brakes, which I like, it has the same motor as the FZ models, but simply spec'd down to better gas mileage and less top end.  So I have, for the last week or so, been doing some research and getting exited about my upcoming purchase.

Yamaha FZ-16
Tonight, however, came a new revelation.  I have a Brazilian friend here who is going back to Brazil in 3 weeks.  I knew he had a bike by the helmet I sometimes saw him with (which has a Yamaha symbol conspicuously on the front).  So I ask him what bike he rides.  An F-Zed is his response (you'll have to forgive him, he's Brazilian).  He says to tell anyone who is interested that it will be for sale before he goes to Brazil.  I say I am interested.  So it looks like for less than I was going to spend on the SZ-R I may be the owner, soon, of a low-mileage FZ-16 (which is the bike I really want anyway).  Here's to hoping.


Wednesday, May 16, 2012

Inspirations in simplicity

So my two daily bike blogs are Bubble Visor and BikeExif.  Today they both had beautiful bikes that are the dividing line between what I would want to do if I find a donor bike here.  Of course I won't be working with a Triumph but probably a cheap 100cc commuter the style is what is the focus here.  The big question is scrambler or flat seat cafe.  You Decide!

Tridays Triumph Scramber
Deus Triumph Cafe

Sunday, April 8, 2012

RV90: The Dilema

I know my 1 faithful follower has been dying to know the status of my Buddy's VanVan so I will provide an update.

So a few weeks ago we set back to work on the machine.  We had already reset the points (which were way off) and had provided a spark, which was the initial problem with the machine, no spark.  We also took out the carb.

After soaking the carb in Pinesol for a few days we rebuilt it.  We have since found out that we didn't clean the fuel inlet line and no gas is getting to the float bowl, and the float bowl is leaking so we removed the carb again.

Though we weren't getting fuel, we still could not get any kind of pop or crackle when we used starting ether.  It would just pump it right out of the exhaust pipe.  Very frustrating.  We did find that the spark plug had some grimy mud on the end.  I had seen this once before on the old plug and thought that it was a minor issue.  Now there is more mud on said incendiary device.

A little history of the VanVan:
It was once fully submerged.

So to inspect the source of this mud we took the head off of our stubborn little 2 stroke ad there was a bit of this brown muck on the piston head and cylinder.  We did wipe off a significant coating of the brown combustion retardant and tried to kick her over again, hoping it was a localized problem.  Apparently 2 stroke motors can mump mud into the cylinder as efficiently as gas-air mix.  So we decided it was time for a closer look.

Last week my buddy and I removed the motor from the VanVan, which only took about 45 minutes. We will now take the head and Cylinder off and see if the mud is going to require the case to be split, which I am now 90% confident that this will be the required answer.

Bummer.

Sunday, March 4, 2012

RV90 Day 1

Made some progress on the RV90 yesterday.  Didn't take any pics but the rust was minimal and the electrical and rubber components all looked good.  There was no spark when we started but we put in a new plug, gapped it, reset the points, and we got a good consistent spark.  Still no pop or gurgle but we brought the little Mikuni VM carb home to rebuild it.  Hopefully we will have some pictures next time.

Friday, March 2, 2012

Vintage BikeGeek

I am positive that our RV90 is going to look nowhere as nice as this one
After many attempts and persuasion my good buddy has finally picked himself up an old motorcycle.  I know a 1972 RV90 almost doesn't classify as a motorcycle but the more I have looked into it the more stoked I am to be the technical adviser on this project.  I love to see an old motorcycle that has been rotting a rust heap in the back of someone's garage or barn be resurrected or even reincarnated into a functional machine that someone will enjoy.  I have several friends who are at various stages of the process.  Most of my friends on such an adventure have simply moved the rusting hulk from one garage to another.  This includes my '81 XS850 that was sold last winter (Chew's Cafe) and a friend's Virago 920 that I envisioned as a sweet bobber but has so far had one exhaust pipe removed.  Another friend of mine went so far as to strip down his RD250 and hopefully will start putting it back together in the near future.  Atticus here is my shining prodigy.  He not only bought the bike but he has taken steps to take a stripped down GS550 that was thrashed for a crappy race bike and has made it into a smooth running machine.  Unfortunately he is heading off to Iberia and may be selling it.

Atticus began the journey in a very similar place to myself.  Both of us started more likely able to assemble a light saber with the proper components than to rebuild a carburetor.  When I moved to the state of Ohio in 2007 I did not know how to change my own oil.  I did not even know what the purpose of a carburetor was.  I dreamed of buying a bike my whole life and after working with a 'Winger for 2 years I finally felt like I could make the jump.  When I bought my bike it was an ugly bagger.  Large fairing, hardbags, huge windshield, it was the bike I never wanted but it ran and so I bought it.  After it stopped working a short time later I tore out the carbs, the starter, and basically made the whole situation a whole lot worse.  After I finally located the real problem was in the  bus fuse housing I had a much bigger repair and rebuild than I had started over with.  Luckily the motor was in good order but the carburetors were filled with rust and the bike was still ugly.  Luckily my buddy Tony made the concession to allow a piece of 'Jap Junk' into his garage and under the ominous sign reading 'Harley parking only, Rice Burners will be crushed' we began to put Mio back together.  We stripped her down to look like a real motorcycle and got the carbs tuned in and running great.  My dream was to cafe the bike but I never had the time or money in the timespan available.  Last summer she didn't run for a large chunk of riding season due to a failed brake system landing my in a ditch along the state route.  But a few master cylinder rebuilds and SS brake lines later she ran (and stopped) like a champ.

Atticus pursued the motorcycle experiment after hearing tales of the mechanical chutzpah I had accrued during this time.  After reading Zen and the Art of Motorcycle Maintenance he started to dig in.  There is a perfect correlation between those nerds who read ZATAOMM and actually worked on their bike, and those who didn't.  Interesting.  After working on some ignition issues, putting mufflers on the straight pipes, and velo stacks on the intakes, he had a bike that ran and the courage to actually apply a tool to something mechanical.

All this brings me to a little 90cc beach bike that my buddy's father-in-law found in his barn.  It has no spark,  the tires are probably dry rotted, and who knows what condition the frame is in.  The important thing is, though, that when we have applied our limited wisdom and intelligence to the project we will most likely have a running machine that was good for nothing more than scrap previously.  This new buddy has very little mechanical experience and even less gusto but by the end he will be a code flinging grease knuckle like myself.
The FZ6

Part of what I love about motorcycles is they are very simple machines.  The systems are easily visable, are easy to access, and easy to understand.  Plus motorcycles are pure cool.  I fell in love with the Kawasaki Ninja when I was 6 years old.  I saw toy ninja at a flea market and it looked fast, and it was a Ninja.  Ninjas are cool.  Ever since then I liked motorcycles but new nothing about them.  Then in college I stumbled on the Yamaha FZ-6.  I have never totally been sold on crotch rockets.  I have never liked cruisers.  I can dig an occasional bobber, something nice a ratty but I had never heard of cafe racers at the time and this bike, a sporty but utilitarian bike, sang to me.  As I started to dig deeper into bikes I found that there was a whole spectrum between a Harley Electroglide and a Hyabusa.  And I was hooked.  I started reading Cycleworld and similar rags and then, after college, I found an article about WrenchMonkees.  I saw this bike:


I never realized what was possible with 2 simple wheels.  The simple beauty, the feel of speed while standing still, plus I had a weakness for the copper piping.  After I saw this bike, I had a new obsession.  An obsession that I have done my best to pass on to anyone who will let me.  

Tuesday, January 31, 2012

Motorcycle Woes

On a motorcycle, the usual battery is a 12 volt alternating current. 12 volts isn't sufficient, though, to create a spark that will ignite gas to cause a piston-moving explosion in the engine. The ignition coils of a motorcycle solve this problem by creating and collapsing a magnetic field many times a second and sending out bursts of much higher voltage along the circuitry to the spark plugs. To time these magnetic field creations and collapses along with the upward and downward motion of the pistons so as to get a high-voltage spark at the right instant, the circuitry is built into a rotating "crankshaft". As the crankshaft is turned by the pistons, the breaker points on the crankshaft connect and disconnect, alternately completing and opening the circuit connected to the ignition coils.

See picture of my breaker points below:


I noticed the other day, when trying to get my bike to start up properly, that the ignition coils were severely overheating. Taking off the cover to the crankshaft and rotating it several full rotations with a wrench, I realized that at no point during the crankshaft cycle were the breaker points actually opening. The circuit was never being opened! That meant the coils' magnetic fields were never collapsing, never creating the proper high voltage necessary to start and power the engine.

I adjusted the breaker points so that at their farthest apart they'd be .3 to .4 millimeters wide, the specs according to my manual. Then, according to the manual, I was supposed to do what's called a "continuity test" to make sure that the circuit was being broken at the proper time in the crankshaft cycle. The way you're supposed to do this is to ground one end of the tester to the engine, and attach the other wire of the tester to one side of the breaker point. The you turn the crankshaft until you see the meter needle drop, indicating that there is no power flowing through the circuit.

The needle never dropped! It looked like, even with the correct gap between the points, the circuit was ALWAYS complete. The magnetic field still shouldn't be collapsing! But after that first gap adjustment, the bike turned on just fine!

How was the bike turning on while the circuit was constantly complete? More importantly, why is the circuit constantly complete! Electricity isn't crossing that gap between the breaker points when they're open. It must be crossing straight across the base plate that holds the points in place. Some sort of insulation isn't working properly in the circuit, allowing electricity to flow where it shouldn't.

Here's a picture of the way the wires are connected to the breaker plates. It's a zoomed in version of the picture above, zooming in just to below and to the right of the central hex bolt:
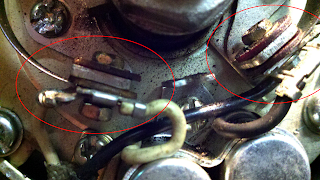

So the electricity flows up the black and white wires onto the each of the two screws at the connections indicated by the red circles. It goes onto the thin spring breaker plate (visible on the left connection coming out to the left and heading up-left off the picture) and, theoretically, along the plate up to the point. It also, in parallel, goes into the condensers (the metal cylinders seen at the bottom of the picture). At the same time, though, it looks like the electricity is flowing onto the bracket that holds the screw in place, and down the bracket onto the large circular baseplate holding this whole contraption in place.

So that's the first problem! In summary, I can't do a continuity test to make sure the circuit's connecting and breaking at the right points of the crankshaft cycle because, according to my instrument, the connection is always being made, even when there is a visible gap between the breaker points with no spark crossing.

Remember, all of this is without the bike running. When I start the bike up (which it does easily), I see sparks arching across the breaker points. This isn't supposed to happen. The voltage should not be high enough for a spark to cross a gap in the air - it's damaging to the breaker points. With a spark crossing many times a minute, breaker points develop pitting over time that can destroy them.

That's the second problem.

The third problem is that whenever I rev the engine over around 2.5k revolutions per minute (rpm), the engine sputters out of and dies. We believe that this is due to a timing issue - as the crankshaft turns faster and faster, you want the spark to be exploding gas in the cylinders at a different point of the piston's motion. This probably has something to do with the breaker points as well, but we can't check the timing if we can't do a continuity test, which we can't do since we constantly have a closed circuit!

And those are all the issues with my bike right now!

Saturday, January 21, 2012

Sweet Bike Blog

If you want to spend hours looking at pics of classic and custom bikes, this is the place. Those Japanese Chopper clubs put our boys to shame!

http://bubblevisor.blogspot.com/

Tuesday, January 17, 2012

I wrote up the following document to help Atticus work out some Gremlins in his Electrical system. Hopefully he will post his findings later.

The key is to isolate individual systems and test them, then components instead of thinking of the wiring loom as a whole.


Where to Start:


  1. First step, Look at your wiring diagram. See how many grounds you should have, and then go through and find them all, look for any others. There is no point trying to track down other issues until you know your grounds are good and clean.

    1. Clean them with scotch-brite or emery paper (300ish grit sandpaper) until the metal gleams on both the connection end and the frame/engine part.

    2. Re-attach with dielectric grease

    3. A lot of problems can be solved with nice clean grounds.

    4. If a connection is super corroded put a new eyelet on it.

    5. Completely replacing the main ground strap would not hurt.

  2. Check the voltage at the battery with the bike off.

  3. Check that your fuses aren't blown.

  4. Check your voltage to the fuse and what it is after the fuse.


Headlight:

  1. Understand your lighting system

  2. I would recommend sketching out something similar to this to simplify the wiring diagram so it is not cluttered with other stuff (lowbrow has a really cool example):
    http://www.lowbrowcustoms.com/index.php?l=page_view&p=tech_triumph_british_chopper_wiring_diagrams

  3. Use a voltmeter to see what tabs on the back of the light are getting juice when it is set to high beam. If the voltage is different on high vs low then the problem may be with the bulb (burnt out filament or power plan (4)). If it does not change, move back to the switch.

  4. I know for my Yamaha Triple the headlight worked like this: One Ground, one hot for low beam and both hot for hi-beam. Once I traded out my bulb to a brighter one I had to change the wiring so that low was hot for hi but only the hot tab was hot for high beam. If the same thing happened for yours you should see if the high beam lights up if you only give the one tab a hot wire. See ill.


  1. See if you can check the wiring in the switch to see if the issue is the switch itself or if it is the wiring between the switch and the lamp.

  2. You can disassemble the switch (it is probably just a knife switch) if that is the problem.

  3. I would normally recommend starting from the battery and tracing the current at each component on its way to the switch but since we know you have juice at the headlight than we don't need to do that.

Flashers:

  1. Make sure you understand where the voltage goes to make your signal work.

  2. Make sure that flasher relay is getting voltage when the signal is turned. If it does not than make sure the switch is getting voltage. There are probably grounds at each of the turn signal stems (where they bolt on) clean and dielectric grease them.

  3. You can jump your bulb to see if the bulb itself works. B/c of the bi-metal switch in the relay if a bulb is burned out it will not have a circuit and the flasher relay will not heat up and therefore will not function.

  4. I had a bad relay on mine and when replaced it worked properly. My flasher relay was one out of a motorcycle graveyard but I have since discovered that you can just pick them up at AutoZone. You can tell which relay is the flasher relay by the wires that go into it (using your handy wiring diagram). You can jump the circuit with the relay out and see if your lights light up (a good test to see if you relay is bad). You could probably just do this step first but it will be good to do the other stuff to get to know where everything is).


How to attach a connection or repair a break.

  1. You can do a better job with a soldering iron but since I do not have one I usually go without. Trim back enough wire insulation to show the copper inside (usually about ½”).

  2. Slip an appropriate length of shrink wrap over wire (make sure it will fit over the connector when crimped).

  3. Cover wire in solder, insert into connector, and crimp. I use hefty channel-locks to make sure it is well crimped.

  4. Slip heat-shrink over connection, and heat with lighter or hair dryer.

  5. For wire to wire connections you can solder them together w/o the butt-connector and then heat-shrink but again, I use butt-connectors b/c I don't have a soldering iron.


Monday, January 9, 2012

1978 Suzuki GS550

Want to learn how carburetors work? Just found a site all about them. It might just be able to help out with getting my bike to idle properly. We'll see! I'll be heading over to work on the bike tomorrow, and will be posting some pictures of it after I've got my new air filters on it!

Friday, December 9, 2011

Who I want to be when I grow up

I stumbled across this link on one of the motorcycle forums I frequent. Adam Cramer here voices some of my concerns about today's culture and shows the viewer some pretty sweet bikes. Plus, who doesn't like to watch hot metal shavings fall once and a while.

Who ever said smoking isn't cool hasn't met this guy.

http://www.etsy.com/blog/en/2011/handmade-portraits-liberty-vintage-motorcycles/